Thank you for choosing D2 shock absorbers!
The damping setting and spring rate for this product is different from the vehicle’s original shock absorbers. Any shock absorbers can be disassembled completely to change the damping setting.
Disassembling the shock absorber also offers a chance for inspection and service to the shock. However, disassembling of the shock absorbers can only be performed by certified professional technicians.

Introduction
- Removing and installation of relevant brake parts will require specialized technology, and installation of this product shall be performed by qualified professional technician
- D2 will take no liability for any accident, damage or death caused by improper installation of this product or using parts not supplied by our company, or retrofitting this product without our permission.
- Do not install this product in vehicles other than those models specified in user’s manual
Please read the instructions before installation.
- Before installing this product please read the installation instructions very carefully.
- Before installing this product, ensure all necessary components are available.
- Please ensure all D2 components on the shock body have been secured tightly. Components that shall be truly secured are: nuts, nuts on eye, upper holder, bracket holder, bolts with horn adjuster (if supplied), and any other parts. Be sure to tighten bolts on upper holder and angular tube of bracket holder.
Import Product Messages
- This product contains high-pressure gas inside. Do not attempt to disassemble this product or put it in the vicinity of fire to avoid the risk of serious explosion. Do not install this product if it is found having been disassembled before.
- This product has been designed with reinforcements to be used in vehicles operating on terrain. In addition, this product cannot be modified for any reason.
- If the upper holder has been turned with over-torque during removal or installation, the bolt in the shock may be loosened. In addition this may cause damage to the product.
When installing this shock, do not overturn with too much torque unless it is absolutely necessary. However, if it must be turned with force, ensure that it is turned with low torque and be sure that the cylinder hasn’t been turned.
D2 shall not take any liability for loosened bolts caused by over-turning.
- When removing or tightening bolts on the upper holder, do not use any tool to clamp the cylinder at the top of the shock or clamp the shock body onto the place where there are treads to avoid scratching.
- Do not bump with force and/or impact the shock body (e.g. dropping this product)
- If the cylinder has been scratched, the seal may be damaged and cause the shock to leak.
- To increase the product durability and performance, the outer diameter usually is greater than that of the original shock absorber. Some shock absorbers do not
contain boots due to space limitation for a boot. For the product without a boot, we suggest the surface of the cylinder be cleaned regularly and check the shock periodically to ensure the performance and increase the lifespan of the product.
Please note that dirt and small pebbles may damage the cylinder.
Before and after installation
The operator shall install this product correctly and properly. Before installation, please read the instructions carefully.
- When installing this product, the operator shall wear gloves to avoid the risk of hand injury.
- The upper holder used in this shock must be D2 original component. This shock absorbers may not be compatible with the upper holder of other brands.
- D2 shall not take any liability for damage to the shock or accidents that are caused by connecting the upper holder of other brands with this shock.
- Be sure to observe local relevant vehicle regulations about usage of adjustable shock absorbers. (For example, height limit, headlight ground clearance limit)
- D2 shall hold no liability for any violation against local vehicle regulations or laws.
- According to the installation instructions, avoid uneven road surface and driving at low speed.
- Ensure that components of the product are not loosened or oil is not leaking.
- To tighten all components with specified torque periodically.
- When a suitable height is determined it shall be tested and calibrated on straight line.
- The vehicle should go to a specified workshop or a commissioned vehicle calibration center to adjust the calibration.
Removal of the shock absorber
- To remove the nut at the top by depressing the spring with the spring depression tool.
- When taking out the nut at the top, make sure the spring is depressed and is not in contact with the upper and lower holders.
- When releasing the spring depression tool, pull the spring out of the shock evenly and carefully.
- Do not re-use the used nut removed from the cylinder.
Installation of shock absorber
- The adjustable damper uses a hollow cylinder. To protect against damage, be sure to note the torque applied for turning.
- When tightening the nut at the top, be sure the tool does not contact the adjustment point at the top.
- After installation, ensure using an adjustment level so that the adjustment scale is truly in a clockwise direction. Adjust it with the adjustment level.
- Lowering the vehicle with lowest setting of the spring holder may damage the body of the vehicle.
- The shock absorber will be coated with a lubricant at factory to protect against rusting, which is not leaked fluid.
- After the height is adjusted, be sure that the spring holder has been tightened.
- Drift or small pebbles may attach to the spring holder has been tightened.
- Dirt or small pebbles may attach to the spring holders, which may also cause damage.
- Dirt or small pebbles may attach to the threads of the spring holders, which may cause damage if adjustment is made without clearing them.
- If the component cannot be turned smoothly, add some lubricant. To prevent sticking of the spring holder, we suggest that the components be checked and serviced periodically.
After adjusting the height, make sure the spring holder has been tightened. If not, it could cause damage to the vehicle.
- After putting on tires, measure the distance from the tire center to the fender of the vehicle (as shown in illustration and make sure the distance meets the following data:
Data should be selected based on model and weight of the vehicle.
- When adjusting according to driving a specific vehicle (for example, on race track), it is possible to make an asymmetrical setting for the right and left dampers.
- If it is uneven longitudinally, adjust only the front or rear damper.
- In some vehicles, you may need to remove the interior components before making the adjustment.
- When adjusting the damper, you may wish to modify the interior equipment of the vehicle.
- When it is necessary to adjust the damper, you may need to drill holes in the interior of the vehicle.
Important notes
- All D2 products are used for racing cars, vehicles operating on non-normal road conditions and also vehicles for demonstration purpose.
- D2’s products should not be used in vehicles operating on normal road conditions.
- D2 will hold no liability for the ban of this product due to local regulations or laws.
- Vehicles with this product running on normal highways may cause damage or violate local regulations.
- The purchasers shall bear full liability for the component installation.
- All components must be installed by certified professional technicians.
- D2 will hold no liability for any damage or death caused directly or indirectly from this product.
- D2 will hold no liability for any installation error, including errors due to inadvertence.

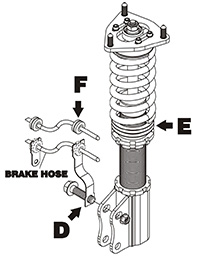
D is used as the retaining tab for brake lines or ABS wiring, you can take liberty to install the brake fluid line by changing the angle.
E is the shock bearing, when the vehicle is in standstill, there is type of sound like ‘DONG~DONG~DONG’ while you are turning the steering wheel, please check if plastic bearing or metal rings are all defective, greasing these parts can fix the problem.
F is the rounded rubber in the work bag. Please insert brake hose to rounded rubber and put the rounded rubber into the groove of washer.

- Please ensure the lower bracket is tighten before driving.
- Please do not use the adjustment wrench to lock the lower bracket, the adjustment wrench is for adjust ride height. If the lower bracket is tighten by the adjustment wrench, the unusual noise will happen again after 7~20 days.
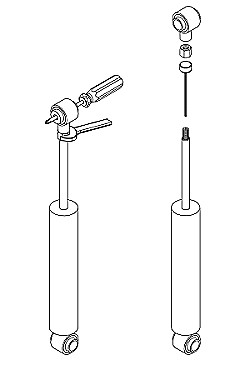
- Please use the screwdriver and hammer to knock the lower bracket at the following picture, and stick with the tape to avoid the unusual noise.
For some models, the rear shock is not a full coilover (separate spring and shock) and there are bushing on the top and bottom; in this case, you should adjust the 36 ways different dampening settings as the instruction.
Shown as the picture.

Ride height adjustment of non-full coilover instructions

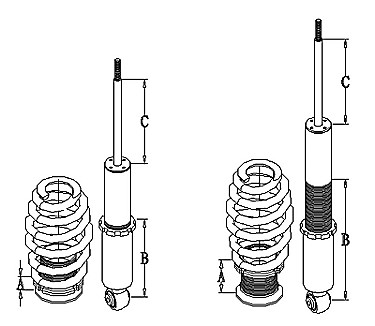
The spring and the strut are separated on the rears of some certain vehicles. Please make an adjustment in ride height and length of strut by carrying out the following steps:
- A is to lower or raise the ride height.
- After required ride height is reached, it’s essential to adjust the length of coilover by adjusting B to your desired position.
- After required ride height is reached, put the tire on and move the vehicle around 5-10 m. Please adjust B to let C insert 1/3 parts into the strut and leave 2/3 parts outside the strut; tighten the spring perch lock of B.
- The unusual noise and a breakdown will occur if failure in adjustment in the length of coilover is reached.
- 30m/m of the mount need to leave threaded on the shock body to be safe.
High performance suspension


No Comments